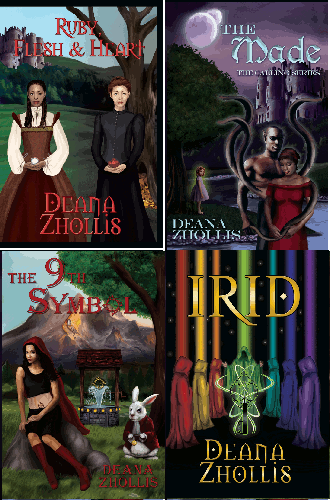
Archive for November, 2008

Book Covers

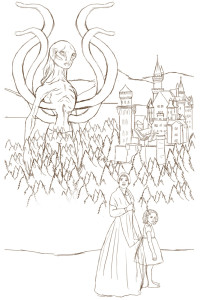
I wanted to show you the progress of my books covers. I didn’t provide much detail and the relationships between the characters to give my Book Cover Designer the idea of what I was looking for. Because of that, the alien looked pretty scary and too alien.

RoughDaft1

RoughDaft1

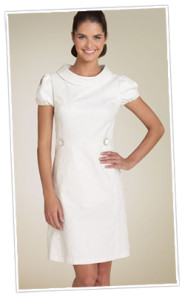
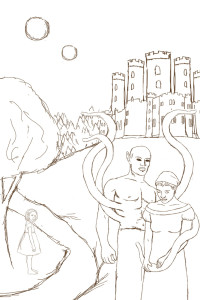
So then I told her what that it was a romance book and I wanted an alien with a six-pack. LOL! I know, I told her, sounds funny, but that’s what I was looking for. Also, I wanted the little girl to be in the background since she was an observer. Oh, and two moons. And change the dress since the other one, though nice, was not the futuristic kind of Maid outfit I was looking for. I sent her a model of a dress and also a picture of a castle that I thought it could kind of look like that I got off the internet after some searching.

dress and castle

She was great with all of my suggestions. She then sent this.

RoughDaft2

RoughDaft2

And this was perfect! So I waited for the coloring.

CoverArt1

CoverArt1

This was great! And I wanted to add a bit more greenish glow to the girl and gave her the wording for the back of the book and I got my final.

CoverArt1

CoverArt1

And I just loved it!

My Back Cover Wording

Emera’s tale is nothing close to Cinderella’s. Her prince covets only her pheromones, which is necessary for him to live.

With each night of ecstasy, Emera feels herself falling for her alien lover until a night of strange, hungering desires begin to haunt her, changing Emera into something neither Human nor Wendh. Before Emera is given answers, however, she is forced to separate from him.

Alone for the first time in her life, Emera must learn to control her Wendh gifts until she can make her way back to her prince.

During her journey, she learns the precarious joys of freedom as she is joined by Tokie — an ancient, impish being who dwells in the form of an angelic child. Together they discover that Emera’s very life is the key to saving a lost love between a king and his queen, stopping a war between a father and his son, and changing the social order between Wendhs and Humans — master and slave.

So there you have it. My journey for the Book Cover Design and it’s details. It was definitely more than I had bargained for (she was wonderful!), and definitely better than my imagination.

See the future post for Irid’s Book Cover design steps.
See future post for Ruby, Flesh and Heart Cover design steps.
See the future post for The 9th Symbol steps.

How to format your Book – MSWord

NOTE: Want to watch an Instruction Video for the below that has a template? Just go to Deana Zhollis Writing Tools.

Sigh. Another milestone that I had to accomplish. Formatting my book.

I remember, somewhere in my mental database, authors complaining about page numbering and book layouts. I thought, “No big deal.” I’m pretty good with MSWord and such. Shouldn’t be any problems.

WRONG!

I can’t tell you how many hours and hours I spent trying to get my book to layout the way it’s suppose to. I never knew it could be so complicated. Hopefully I can remember all of my steps.

STEP 1: FIRST FEW PAGES
LuLu doesn’t really give you the “start pages” information–at least I didn’t see it with my quick overview. So, I pulled down five (5) books from my bookshelf and took a look at what they had, and on what pages. Every book was different. One might have a small snippet of the book on the very first page, while others had prologues on third or fifth page. Some had review quotes on the very first page, and other had the title of the book. So, basically, I had to just pick what I wanted. I put my beginning pages for my book in this order:

  • Page 1 – A snippet of the story
  • Page 2 – Copyright information, book designer, ISBN, “this book is fiction” info
  • Page 3 – Dedication
  • Page 4-6 – Illustrations
  • Page 7 – Table of Contents (go here on how to created on in MSWord)
  • Page 8 – blank
  • Page 9 – Book title

STEP 2: PAGE LAYOUT
This part I’m not quite sure about since my book is so big. I’m not sure if I formatted for printing correctly. I’ll find out once I order my book and it comes in the mail. LuLu gives you some general information, and that all depends on the size of the book, so for my 461 pages (this page number counted changed several times–more on that later), I went on the internet and found some general information and Under FILE > PAGE SETUP formatted liked this.

  • Margins: Top, Bottom, Right, Left – All to 0.5
  • Gutter: .25 (This is the crease of the book)
  • Multiple page: Mirror margins
  • Paper size: Width 6″ and Height 9″
  • Layout: Section Start: Odd Page
  • Checked Different odd and even
  • Checked Different First page
  • From edge: Header 0.25″ and Footer 0.5″

Make sure to Apply to “Whole Document” for each tab of the Page Layout

  • FORMAT > PARAGRAPH…First Line Indent .25
  • Font Style: Palatino Linotype and Font Size: 12
  • Modify Heading 1 Style to have:
  • Paragraph: Alignment: Center
  • Hanging 1.2″
  • Spacing Before: 12pt and After: 6pt
  • Font Style: Palatino Linotype and Bold and Font Size: 14
  • Line Spacing: Single

I mostly got this format from the small publishing site called Trafford, but it’s not longer on their page.

STEP 3: SECTION BREAKS ODDS/EVENS
Now, you remember the first list of pages on Step 1? After each page I put in a section break. After the “snippet” I put in INSERT > BREAK > EVEN PAGE. Remember, a book has a left and right side, so you have to tell MSWord how you want the pages to appear. You can just put Page Breaks and try to get the pages to line up right, but that’s pretty cumbersome to deal with. The very first page has to be on the right side, the ODD PAGE, so the PAGE SETUP makes sure of that. However, the Section Break (Even Page) makes sure the next page is on the EVEN PAGE. I had to alternate the Section break from Odd to Even for the first few pages before I got to my chapters, and then at the end of each chapter I enter a Section Break (Odd Page), to make sure all of my chapters begin on the right side of the book. To View how it would look, you have to see it in PRINT PREVIEW, and then select to see multiple pages.

This was a real pain to figure out

STEP 4: FONTS
I initially had my book in Courier and double-space, your know, for sending it out the traditional way to publishing houses, as well as LEFT JUSTIFIED. But then I had to figure out the font I wanted to use for printing, and had to change the paragraphs to JUSTIFIED, as well as taking out the double-space after the period and inserting a single-space. I must be old to not know that we don’t need to double-space anymore. Sigh. The things we learn. So, I started off with Lulu, since my research said it was the easiest to use to get your feet wet. Not too easy! If LuLu is easy, then I hope I have enough experience there to go to CreateSpace!

Well, anyway, LuLu had a great section on book formatting, and basically gave me three choices of font: Garamond, Times New Roman and Palatino (there were others, but those were the basics). Well, then I started playing around with the fonts, and since I had a lot of italics, I had to pick a font that was readable in italics. Well, I started with Garamond, which was cool, but not so cool with italics. Times New Roman just didn’t look right to me, and so I went to Palatino, but in my MS Word I had Palatino Linotype. So, I figured that was the same thing. But I had different styles and fonts all over the place, even though I used Select All and changed the font to a universal one. LuLu still thought that there were fonts there that I knew I wasn’t using when I tried to upload. So I had to learn how to EMBED the font into my pdf file. This makes it so that if a document had a font that isn’t on someone’s PC then the PC can still read it. Fortunately for me, I have Adobe Converter, but for those who don’t, they find places for free like PDF2Go that converts to up to 100mb here without needing to purchase Adobe.

I also downloaded CutePDF which can convert jpg and almost anying to pdf by simply opening the jpg in your normal software (Like Microsoft Office Picture Manager or GIMP), select the FILE > PRINT, and change your printer to CutePDF Writer and it will convert it to pdf. And that software is FREE!! I also downloaded it from NiNite that has all kinds of neat stuff, including GIMP .

So embedding fonts directly into the document using these instructions got me half way there. It still didn’t recognize my fonts when I tried to upload, and then I found out there’s a NEVER EMBED section, that I had to take out all the fonts in there and convert my MSWord to pdf again.

Converting from MSWord to pdf, I tell you, takes some time. About 5-10 minutes for my PC. It might have been more if I had a slower PC.
And uploading takes even more time, 42 minutes LuLu told me, but on Thanksgiving, late in the evening, it took no time. So I would suggest uploading on non-peak hours.

STEP 5: BOOK COVER
You can created a barcode like places that have barcode generators like here and used GIMP to edit it and put it on my book cover. It looks a bit too big on the back of the book, but making it smaller diminished the print. So, when I do get the book, I’ll take a look at it. I found the size of a barcode, which they say is: 2.938″ wide x 2.04″, but like I said, using the free barcode converter, shrinking the size didn’t look too good.

You have to upload your book cover separate, and also in pdf format, not picture format, for LuLu. Since my book cover was in jpg, and I already had Adobe, I just open the jpg in Adobe and it automatically converted. But as I said, you can also install CutePDF and print it out as a pdf file (Did I mention that software was free. Heh.Heh.). Also, I had to resize the image to LuLu’s standards, which they give an example of a 6″ by 9″ book will need an image 6.125″ by 9.25″. But, again, since my book has so many pages, my size was 956.25 X 666, suggested by LuLu, but GIMP (remember, GIMP is free) converted it to 956.6 X 664.8. LuLu took that size just fine though. I didn’t have to do all this since my book designer is going to provide the formats and files for my book so I could use, but I wanted the experience on doing all of this just in case I needed it.

STEP 5: PAGE NUMBERS
Remember all those section breaks? Well that really helps with my Header. I went to the second page after my first chapter title and put in the author’s name. Author’s name will run on the even page numbers. Then I went to the fourth page and enter the book’s title, and that will run on the odd page numbers. This is setup on the FILE > PAGE SETUP where I put a checked mark by “Different odd and even and check mark by “Different First page”. The “Different First page” allows for each first page of a chapter (remember, separated by Odd Page Section breaks) so that a page number is not printed. I wanted to have each chapter with the Chapter’s name on the Odd page, but with the numbering issue, needing it to continually run chronologically just in case I had to add more or delete more text, having separate Chapter names effected my page number since each section had to be different from previous section. I left it as simple as possible with the running Title and running Author Name. I inserted a page number, using the Header and Footer toolbar, and then clicked the Format Page Number, and changed the Page Numbering to start at 1. I had to start at 1 in order for 2 to show up. If I wanted the page to star with the number 1, I would have had to put in a zero (0). After a few trail and errors of making sure the Header was, or was not, “Linked to Previous” section I finally got it. It’s doesn’t make since though, since my 2nd page is “Linked to Previous” section and though it shows the title of the author in “Header and Footer” right after my Table of Contents, when I’m out of that mode, it doesn’t show but where I want it. Go figure. But I did have to go to each chapter and make sure the Page Numbering had “Continue from previous section” instead of “Start at” where each chapter started with page number 2

STEP 6: WAIT
Now, just waiting for LuLu to give me the ok, to order my book. In the mean time, I went to www.BowkerLink.com and registered my ISBN, and hope that everything works out okay with the first print.

Novel almost there and Buggin’ Book Companies

The Calling Series: The Made. Almost done, says the editor. We have seven (7) more chapters left to edit, which should be completed by the end of November. And also around that time, the first coloring of the book should be done. $700 for the Editor and $400 for the Book Cover. And it has been worth it!

I’m just so excited about my first printed novel and can’t wait to see it in paper-back form. Perhaps LuLu or CreateSpace just to start off and get my feet wet. No initial upfront cost to me, from what I understand from online research, but I’ll let you know when I get into that process.

You know, I put inquiries in for Xlibris and Author House and they don’t give up when you tell them you’re no longer interested. My goodness. Especially Xlibris, who keeps calling about new “deals” for my book. Not to mention the emails that keep coming even after I replied and said I was no longer interested. I guess that’s good a salesperson for ya. Don’t take no for an answer. But it’s buggin’!

So, think twice about given these people your email and phone number. They will definitely harass you to death. That makes me think again that it’s the author’s money that make them profitable, and not readers.

They say they can advertise and send out book promotional packages for you, and all of these things, but I wonder if the companies, or people they send this information to, become numb. Do they see another Xlibris envelope and just put it aside as just another promotional item and stick it on the slush pile? Makes me wonder if anyone ever got someone’s attention with one of these companies speaking for them. You never can say never. I’m sure there are people out there who have worked with these companies and have done great. I just see a big WARNING! flash every time I hear their message about another “great deal.”

Change…

The suspense is finally over and now we have to wait and see, and hope, what can be accomplished.

President-elect Barack Obama.

Man! It was quiet at the office today. Houston, Texas. I could feel the intensity of negative and positive swirling in the air. What can people say? What can people not say?

We shall see…for he will be our President…too.

Lulu, CreateSpace, Lightning Source.. Oh my!

Yeah. So many choices. So many things to do.

I’m still researching and researching on where and who to print my books. Do I want to print locally? Have the books sitting here in my house and deal with all the labels and shipping and packaging? Do I want to use a Print-On-Demand company…but not to publish it. Just to print.

I’ve first scratched off Xlibris, iUniverse, AuthorHouse, etc, because of the upfront fees, and I’ve already put in the money for what they charge for editor, cover design, ISBN, etc. Plus, If I was going to go with some of their packages, I might as well have the book printed locally and ship it out myself, which might equal the same amount as the packages.

I’ve wavered around Lulu, CreateSpace, Lightning Source, and Booksurge(which is Createspace as well, or also just owned by Amazon?). I hear a lot of great things about LuLu, of course, but, again, to sell a book with no upfront fees forces the book’s price very high. Who wants to buy a $25.00 book? And Lightning Source has the Ingram edge, other places to distribute your book to, and CreateSpace only has its store and Amazon.

I’ve also learned that if I wanted to make some updates to the book, for some reason, Lightning Source charges an arm and leg, while CreateSpace is considerably lower. So some people have created the design and book on CreateSpace and moved them to Lightning Source since they use the exact file format on some paper weight/styles. Then there’s the “hassle” of working with Lightning Source as an independent author, yet in the long run, you get back more royalties.

Decisions. Decisions. Decisions.

Thus, it looks like people use multiple places to have their books printed and available.

And, as you can tell, Self Publishing is a lot of out-of-pocket expenses. But, like I said before, I spent $22,000 on wedding and honeymoon with someone I love, so why not spend some bucks on something I love.

When I figure out where I want to go and what I want to do…you’ll be the first to know.

Decisions. Decisions. Decisions.

My first steps to Self Publishing

Here is a list of the first things I did when starting to Self Publish

Reason
The reason I decided to Self Publish was because I wanted to get more involved with my books, and plus, honestly, I didn’t want to wait on the slush pile. I did the research online on all the cons of self publishing and how it has a certain stigma, but I figure, if I could spend thousands of dollars for a wedding which is ONE DAY, for someone that I love, why can’t I do just as much time and effort on something that I love. It is said not to think about making a profit or being a big time Best Seller, though we all dream of such things. I have come to a decision to at least TRY. So…here I am, and I’m going to try. I’ll put in the effort, do the research, and stumble my way to selling my books. And if I just get a few strangers to buy and actually like it, that would be wonderful to me.

Step 1 – Write the Book
Of course is to write your book. Some people have a problem with this first step, but since I’ve been writing since I was 12 years old, not novels mind you, but writing period. My first novel took a few years, and the 2nd took exactly 1 year. The rest, NaNoWriMo helped me on that. National Novel Writing Month was great! You just write and write. You don’t worry about grammer or spelling or anything mechanical. Just write. This helped me with books 3-5.

Step 2 – Copyright
I’ve sent my books off to the CopyRight Office. Not one at a time, but I lumped them all together on one CD as I completed them, along with my short stories. In this way, I saved money for each of them. When my books are completed in paperback format, I’ll have to research how to send in for copyright then. But I saw you can do it electronically now. When I did them it was still in paper format. CopyRight Office.

Step 3 – ISBN
Since I’m planning to continue writing more books, and I have five (5) already, I went ahead and purchased the block of 10 ISBN numbers from U.S. ISBN Agency. It cost me $275.00. I didn’t buy the barcode since I found out I could get it done for free here. You can buy indiviudal ISBN numbers, however for $125.00. There are some companies who offers ISBN in their packages, but make sure, from what I’ve researched, that you own the ISBN number and not the company.

Step 4 – Editor
I found my Editor on Guru. And I also asked for them for editting samples. There are those who are reluctant to do that because there are people who just try to get free services. But if you explain that you just want 1 sheet editted to make a decision on who you want to edit your book, some will agree to do that for you. I found that it was easy for me to figure out which editor I would like to edit my book with how they editted the sample. I’m in the middle of this stage with editting my first book of The Calling Series: The Made. This is costing me $700.00

Step 5 – Book Cover
I’m in the middle of this step, but I did some research. I found someone to do the art and current after the 1st and 2nd draft, we’re not into coloring now. I also found a Book Cover designer on Guru as well. This is costing me $400.00

Step 6 – Blogging
This is the step I doing now. Heh. Heh. And I’m just started but it’s going to help me stay encourage as I go along.

Step 7 – DBA
Went to the County office and picked up a DBA (“Doing Business As”). In Houston, Texas, I had to look for “Assumed Name” however. I got one for my pen name, seeing that I’m into writing steamy Romance novels; but it’s not for being anonymous. Can’t be if you’re famous. But it will help so that the guys in the suit don’t walk to my office and say, “Uh…your image…” LOL!. I got an Assumed Name for a publishing company as well…just in case I need it. I didn’t add the word “Publishing” so that I can use it for anything I might want to in the future. I’ll just add “A Publishing Company” if that is what I will use it for. I’ll have both names for 10 years and then I’ll have to renew.

Step 8 – Promoting Online
I’m simply gathering information on promoting online and the kosher way of doing this. I don’t want to spam bulletin boards or blogs with “Buy my Book…Please!” LOL! But I’ve learned if you honestly add you input in areas, and have your signature with you website, then you don’t look so selfish.

So that’s where I am so far. I’ll add more as I get to these few steps and tell you the yeahs and nays of my progress. I continue to research other steps at places such as So You Need to Publish Your Book, and watch other authors doing to same as:
Michael R. Hicks (Kreelan Warrior).
Write it! Publish it! Market it!

I actually put in a order for Michael Hick’s book, and if I’ve done that just by researching other authors self publishing, I’m sure other readers and writers (who are also readers) would probably do the same here. And the word would spread.
Until next time….

Designing a website for us HTML beginners

I wanted to put out there a list of sites that really, really helped me with my website. I’m a beginner HTML person, and I can get around with a few things here and there, but I needed a lot of help. I designed my first website from scratch using Dreamweaver (for FREE html software, try out Kompozer. I downloaded it and it works great!) to get a basic idea of designing one, but it didn’t quite look professional enough. So I bought a $30 template from TheTemplateStore and updated it for my new site and I’m really loving it.

Here’s my old website: http://www.oldsite.zhollis.com
And here’s my new one: http://www.zhollis.com

I mentioned before, for my new website, that I used Adobe Dreamweaver and Adobe Fireworks and Swish, which all together can cost over $1,000. I had a friend who I borrowed from, though you can get a trial version of Swish. However, my old website, I just picked up a basic design at oswd. Also at a template store, not at the one I used but anyone that sells templates, they can provide you with websites with programming that you can update yourself without having to buy stuff like Dreamweaver. You simply look at the templates that use CSS based layouts. But if you can find a Free Template to update, I would go that route.

CSS – Yeah. That was a new one for me too. What is it? Well basically, if you have like hyperlinks on all your different pages and you wanted to update the look of all of them without having to update every…single…page, you would put a “class” next to every hyperlink, and in the css coding, you can change the color, or what happens if someone hovers their mouse over a hyperlink, in the CSS code that styles your hyperlinks…and it updates all of your pages at once! Pretty cool thing, but you have to know CSS to use it.
I go here to find out the basics of CSS – Introduction to CSS

So on to my list of useful tools….

++++++++++++++

Free web tools to help you design your website.
I use Dreamweaver, but if you want to save some money, here are some free software to help you design your page.
NVU
Hot Dog
Coffee Cup

Free photo editor – GIMP
This was great for me to use. Especially for those pictures where you want to cut out an image and have it floating on top of another image, like your personal photo. I wanted the background to be transparent, where the background of the picture doesn’t have to be a specific color like white or black, because this might not blend in very well with the background of your website. What I’ve learned is that .jpg .bmp .gif can’t have transparent backgrounds–but .png can. GIMP help me put these images, like this one on my site.

HTML – The easy way to understand it.
I use this site all the time to help me figure out what a string of commands mean.
Introduction to HTML

Neat Scripts to add to your website.
I didn’t use any of them, but with my first website, without a template, I was trying to figure out how to do those neat DropDown Menus that are on some sites these days and I found the code at this EarthWeb site
The actual code for the drop down is here:

How to Make a “Contact Us” Form
I really needed help on creating my own form, and the basic HTML site, though it helped with some things about forms, didn’t quite help with HOW to get the information from the form to my email box. PHP Tutorial: Writing Your First PHP script: Feedback Form Script, help me SO SO much. It helped me understand how to get it working and the little bitty things that you have to know like the position of certain strings in the “mail” section and how you want it to look in your personal email. When I change my website to a template, I had to redo my form, and I completely forgot how I got it working. I came back here, did my refresher course, and BOOM…done.

Dealing with Bots
Bots are those robots, or automatic programs sent out by people who spam your email, website, “contact us” page and comments areas. So you know those images in a box where you have to type the characters of the image before hitting the submit button for a form, and the image changes each time you use it? Those can help out with thos nasty little bots. I found reCAPTCH on some Author websites and I was like, “Hey, where they get that?” With some research I found it and it’s just something to help out with those party pooper Spammers. It was a bit complicated to install and the directions on the actual site doesn’t help much at all for us basic HTML users, but this site helped me out A LOT and helped me get it up and running. Installing eCAPTCHA with PHP

Photo Slideshow
My first slideshow on my old website, I used a
Slideshow on Homepage with JavaScript. I couldn’t blend in the background though, yet it was very useful. For my new website, I learned Swish.

That’s about it. All the information dumping I could put on here that helped me. Whew! Hope it helps you out with your next web adventure.

Installing Movable Type on ICDSoft

Even though I had problems with Movable Type, doesn’t mean that you will.
I modified the instructions a bit below that was provided by ICDSoft, to
make more sense to me; and it might make more sense to you.

You can find screen shots of Movable Type setup here.

http://www.superxm.com/2007/08/movable-type-4-installation-step-by-step-with-screenshots.html

NOTE: I’ve updated this page with newer instruction, since my first instructions were back in 2008. This is most rececent Jan 2011.

+++++++ HERE WE GO ++++++++++++

I hope these more “simpler” instruction might help some with their installation. Follow these steps to install Movable Type:

1. Download the installation from the site of the vendor. Movable Type can be obtained from:

http://movabletype.org/

2. Once you have downloaded the zip file that contains the installation, and uncompress it (unzip it) in

your C; drive, you need to upload the files in it to your disk space/hosting site.

Logon to ICDSoft, go to File Manage and create two folders

under the root directory: 1) mt and 2) mt-static.

For Instant, if your Blog Url is: http://blog.tomjoe.com

Then create the folders under: /home/TOMEJOE/www/blog/

I used CoreFTP to upload my files, but you can use whatever applications with FTP.

A free software suggested was here: http://filezilla-project.org/. But I’m assuming since you already have an account with ICDSoft, you know how to do this part already.

3. Using FTP, upload all of the files in the “MT-5.0-en” folder into the “MT” in ICDSoft folder EXCEPT for

“mt-static”. DO NOT UPLOAD the folder “mt-static” Also remember, you’re only uploading the files, DO NOT

UPLOAD THE FOLDER “MT-5.0-en”, just all of the files in it.

PATH IS: /home/TOMEJOE/www/blog/mt

4. Upload all of the files of under “mt-static” on your C: to ICDSoft folder “mt-static”. Remember, you’re only uploading the files, and not the entire folder. Remember: “mt-static” folder and “mt” folder are both under the root directory.

PATH IS: /home/TOMEJOE/www/blog/mt

PATH IS: /home/TOMEJOE/www/blog/mt-static

5. You need to create a MySQL database for the Movable Type application. From ICDSoft Control Panel, click

“MySQLDatabase”. In the “Create new database” Create the name for the database.

It should look like “tomjoe_blog” or “tomjoe_myblog”

In the “Collation” field, it should be: utf8_general_ci

Click the “Create” button

You will have to create a login/password called a “MySQL User” for this database. There will already be a login created, which is the “master” account. That is a default. You also need to create another MySQL subuser for Movable Type to use to log into your database. You don’t want them to use your master account since that’s the same one you use to access you host/website information.

Under “Create new MySQL user”

EXAMPLE:

Database Name: tomjoe_blog (use pull-down menu to selecte your database name)

MySQLUser: joetom

Password:

Confirm Password

Be sure to grant all privileges to the newly created MySQL subuser, by clicking/check makr all the words in the “Privileges” box. And click the “Add” button. And after you save it, make sure the ID has all of the permissions as listed below in the “MySQl users”.

Select, Create, Create View, Execute SP, Insert, Alter, Show View, Update, Lock, Alter SP, Delete, Drop, Create SP

6. Go back to File Manager and browse to the directory where the extracted files for Movable Type are located. Copy the file “mt-config.cgi-original” to “mt-config.cgi”. NOTE: Make sure to copy so you will have the original just in case you mess up something.

7. Click the file “mt-config.cgi” through the File Manager.

At the line specifying the “CGIPath” you need to enter the URL (web address) to Movable Type under your account. It should look similar to this:

http://example.com/mt/mt-version/ (Another Way: http://tomjoe.com/mt/)

At the line specifying the “StaticWebPath” use the address path for “mt-static”.

It should look like:

http://example.com/mt-version/mt-static (My ways: http://tomjoe.com/mt-static)

NOTE: Below I give an example of how the “mt-config.cgi” file should be configured for your MySQL database settings.

DEFINITIONS

Database: You need to specify the MySQL database you created for your Movable Type application.

DBUser: You need to enter the MySQL username you created at your web hosting Control Panel’s MySQL section for your Movable Type application.

DBPassword: You need to enter the password you assigned to your “MySQL subuser”.

You will also need to add the following line under the rest of the MySQL settings:

DBSocket /tmp/mysql5.sock

After that you need to delete ALL THE the lines in the file, which include the “POSTGRESQL”, “SQLITE” and “BERKELEYDB” database settings.

BELOW IS AN EXAMPLE OF HOW “mt-config.cgi” file should look like

++++++++++++++EXMAPLE+++++++++++++++++++++++

## Movable Type configuration file ##

## ##

## This file defines system-wide settings for Movable Type ##

## In total, there are over a hundred options, but only those ##

## critical for everyone are listed below. ##

## ##

## Information on all others can be found at: ##

## http://www.movabletype.org/documentation/appendices/config-directives/ ##

################################################################

##################### REQUIRED SETTINGS ########################

################################################################

# The CGIPath is the URL to your Movable Type directory

CGIPath http://www.example.com/cgi-bin/mt/

# The StaticWebPath is the URL to your mt-static directory

# Note: Check the installation documentation to find out

# whether this is required for your environment. If it is not,

# simply remove it or comment out the line by prepending a “#”.

StaticWebPath http://www.example.com/mt-static

#================ DATABASE SETTINGS ==================

# REMOVE all sections below that refer to databases

# other than the one you will be using.

#======== REQUIRED SETTINGS ==========

CGIPath /mt

StaticWebPath /mt-static/

StaticFilePath /home/tomjoe/www/mt-static

TemplatePath /home/tomjoe/www/mt/tmpl

#======== DATABASE SETTINGS ==========

##### MYSQL #####

ObjectDriver DBI::mysql

Database tomjoe_blog

DBUser tomjoeblog

DBPassword suzietime1

DBHost localhost

DBSocket /tmp/mysql5.sock

#======== MAIL =======================

MailTransfer sendmail

SendMailPath /usr/lib/sendmail

+++++++++++++++++++++++++++++++++++++++

8. Update the permissions of all cgi files (14 files) to be executable.

In the “Permission” column, change them from “664” to “775”

Do this for each and every file.

9. Rename the “mt-check.cgi” to “mt-check-unsafe.cgi”

If You don’t do this step, you will receive the following message below on step 14:

“The MT-Check report is disabled when Movable Type has a valid configuration file (mt-config.cgi)”

NOTE: This will allow you a direct access to the URL (mt-check-unsafe.cgi) for 10 minutes.

Once having confirmed the system information in step 14, don’t forget to rename it back to “mt-check.cgi” though it would be disabled automatically after 10 minutes.

10. In your web browser, type the path

http://blog.tomjoe.com/mt/mt-check-unsafe.cgi

The message “Movable Type System Check Successful” will appear at the bottom of the screen if the server has all the necessary libraries/modules for installing Movable Type.

11. Remember to rename “mt-check-unsafe.cgi” back to “mt-check.cgi”

12. In your web browser, login into Movable Type

http://blog.tomjoe.com/mt/

OR

http://blog.tomjoe.com/mt/mt.cgi

13. Create the administrator account. Click “Continue”.

14. Create the first website. Click “Finish”. Movable Type will then initialize the database with all the configuration options and settings specified. In the “Create Your First Blog” enter basic information about your blog, the name, Blog URL which is what people will type in the browser to get to your blog, and the string that will get to your directory of files.

15. Click “Sign into Movable Type”

16. Sign back into Movable Type, if asked

+++++++++++++++++

Important notice: You should monitor the site of the software vendor for any security updates of your installed application.

+++++++++++++++++

THAT’S IT. YOU’RE DONE WITH THE INSTALLATION. SO GO HAVE FUN MAKING YOUR BLOG SITE

+++++++++++++++++