Author's Archive

How To Animate Your Book Covers

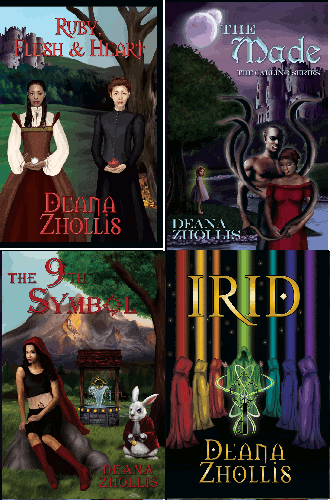
So, in the KindleBoards.com forums, I saw someone’s signature with their book covers moving from one to the next. I’ve been trying to found out how to do that in html, so I sent the author a private message. The key word he gave me so that I could do it:

animated gif

.

YEAH! I love it when I learn a new thing! I didn’t know WHAT it was that people were doing to make their book covers flash around.

He said he used Photoshop. And you know me…! I went searching on how to do it with the freeware Gimp. Sure enough, there’s a quick and dirty way to achieve it.

1) Open each of your book cover images using FILE > OPEN AS LAYER
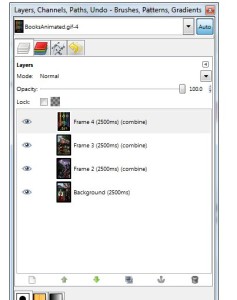
2) Rename each Layer like so: frame 1(2000ms)….frame 2(2000ms)…..frame 3(2000ms) by Right-Clicking and selecting Edit Layer Attributes. If you don’t see the Layer window, just go to LAYERS > RECENTLY CLOSED DOCKS > LAYERS, CHANNELS…

AnimatedGimpFrames

3) Resize each book to be the same size: IMAGE > SCALE IMAGE (I set mine to 546 width and 828 height pixels. NOTE: Whatever size that you use, it must STAY that size for the animation to work. If you try to resize it like a normal picture…it won’t work. So, think of what size you want the animated gif ahead of time.)
4) Take a peek on how it will look by going to FILTERS > ANIMATION > PLAYBACK (Note: If it’s playing to fast or too slow for you, just increase or decrease the ms number of the layer’s file name)
5) Then do the: FILTERS > ANIMATION > OPTIMIZE FOR GIF (this will open a new window)
6) SaVE AS a GIF file and Click SAVE AS ANIMATION when prompted
7) Save the other window as the Gimp file .xcf for updates later on

AND YOU’RE DONE! VERY VERY EASY!!

I don’t know what I’m going to do with it yet on my web page. I mean, I got a hint I’ll use it on the first page of my webpage when I get more of my Calling Series up and then link the image to a Calling Series Book page or something. For now, I just stuck it somewhere on my webpage because I like it (here).

Oh yeah! You can only add ONE hyperlink to the picture. It’s like any other image. So, you can’t put a separate hyperlink for each book image. Now THATS’s what I really would like to do, but I’m sure that’s some kind of movie/image file like I did for my pictures on my website. But that took a lot of work initially. This animated gif stuff was EASY!

Then I updated my blog with it! That’s it on the Right. I use to have it up TOP on my header and had to change my style sheet #header section of the CSS from the imageheader.jpg to imageheader.gif and upload my picture. I just edited over the .jpg file for the header in Gimp, making sure I kept the same sizes (i.e. height, width). I think it looks cool!

Until next month!

Do I need an ISBN for eBooks?

Do you need an ISBN for eBooks? That’s the big debate. For some publishing and distribution platform for ebook authors, the answer is No. For others, the answer is Yes.

I know…kind of a flaky answers, but it’s true.

You don’t really need a separate ISBN number if you’re just selling from your own webpage, and not really for Kindle or the Nook either; but for distribution to Sony and Apple, you’ll need one. These companies need the ISBN number to keep track of the novels, and there’s a difference between eBooks and Paperbacks, just like comparing buying a banana to a cucumber. Each fruit needs it’s own “barcode”.

So, for a wide range of distribution, your ONE novel will need TWO ISBN numbers: one (1) for paperback and one (1) for eBook. Buying a Block of ten (10) from Bowker would help if you have multiple books. It’s a lot more expensive to buy a single one for each book.

I bought a block of ten (10) in 2008 and put a side note to use seven (7) of them. Then, I had to buy another block of ten (10) in 2011 for the eBooks because I wanted to get in Apple and Sony. There was a pull-down menu with a listing of what type that the ISBN number will be assigned to. I simply selected “multiple format.” Don’t select “Kindle” because Smashwords won’t accept an ISBN number assigned for Kindle. And I didn’t select “ePub” either because I wanted the digital copy to have all formats. So “multeple format” is what I picked to cover all my basis. Keeping track of 20 ISBN numbers kinda sucks…but hey….gottah do it.

After I got the ISBN for my eBooks, I then went back to Amazon KDP and placed it there as well as updated my information for Smashword to have it as well (On your Dashboard, look to the left side and you’ll see ISBN Manager).

Below I’ve copied/pasted what Amazon and Smashword has to say when I filled out the forms to upload my eBooks.

For Amazon Kindle Direct Publishing (KDP) for example, they state for the ISBN field:

If your product has an ISBN (International Standard Book Number), enter it here. If not, you can skip this field. Note that this field should not be used to enter the ISBN of the print edition of this book.

++++++++

SMASHWORD on ISBN

Do I need an ISBN to publish on Smashwords?
No, you don’t need an ISBN, although your book will be more successful if you have one. Why? If your book is in the Premium Catalog, it must have an ISBN if you want your book distributed to Sony and Apple. An ISBN number also increases the discoverability of your book, and yields additional marketing benefits such as getting your book listed in more online catalogs and databases.

What is an ISBN number?
An ISBN is a unique number that identifies your book. Many ebook retailers require an ISBN number in order for them to stock your ebook on their digital shelves. It’s how they keep track of orders of your book so they can report these orders back to Smashwords so you can be paid. It’s also how they keep track of the book inside their own systems. For example, there could be two different books with the same title, like “How to Grow to Tomatoes,” but if they have different ISBNs the retailer will know they’re really different books, associated with different authors. The number is registered with the the international ISBN agency and it helps customers and sales outlets (retailers, libraries, distributors) discover your book and differentiate it from other books. If you want to learn more about ISBN, Bowker, the US ISBN agency, has great information at the Bowker FAQ.

Do all Smashwords Retailers Require an ISBN?
No. Other Smashwords retailers, including Barnes & Noble and Kobo don’t require ISBNs, though they appreciate ISBNs because ISBNs are the world standard for tracking, discovering and cataloging books. It can also makes it easier for retailers to properly associate your ebooks with your print books.

After I add my ISBN, do I need to add it to the copyright page and re-upload my book?
It’s not necessary since you’ll attach your ISBN on our ISBN Manager page. However, if you do list your ISBN in your book, note that your one source file will be converted into multiple ebook formats, and you are technically required by the International ISBN agency to acquire a different ISBN for each ebook format (so, a different ISBN each for EPUB, MOBI, PDF, etc.). The ISBNs issued by Smashwords are currently for the EPUB version of your book only. Therefore, if you list the ISBN inside your book, you should designate it as the ISBN for the EPUB format.

I already have an ISBN for my print book. Can I use it with Smashwords?
No. The International ISBN agency is very clear that you should not use a print ISBN on an ebook. Your Smashwords ebook ISBN should be unique to that book.

There you go. Also Smaswords will give you a FREE ISBN (did I saw the “F” word again?). But please note that you can not use their ISBN just anywhere and keep it for yourself. They own it and letting you use it for the companies that need ISBN numbers (like Sony and Apple) that they work with. For me, it is better to just own my own so there will be no conflicts.

Hope this helps out with a major question on eBooks and ISBNs!

Until Next Time 🙂

Just a drop in the ocean of writers

Someone on LinkedIn posted this words

Anyone ever just feel like one of millions of other “aspiring” writers?
As I partake of these social networks (which I love) I do get this depressing feeling that I’m just one of millions trying to get my book published and eventually read? How do all of you deal with this feeling? It sometimes, though not always, can be discouraging, as though there’s nothing “special” about what I’m doing.

I had the same feeling for a long time as well. But then my mother said something to me when I mentioned that I was working on another novel for the public to view. “That’s why we have people like you,” she said, “…not just anyone can do what you’re doing.”

I thought about those words from my mother, and a light brightened that dreary wave of suffocating thoughts. Mother was right. She’s right! Not everyone is actually writing stories and especially completing novels. I mean, look around. Besides the critique groups and fellow writers and forum authors, look at your co-workers, and work-out buddies, and movie-going friends, and dinner couple dating, and socializing and hang-out peers and Facebook and Twitter friends. Look at them. And see how they are looking at you.

THEY ARE NOT ONE OF THE ASPIRING WRITERS.

I mean, what writer hasn’t been approach (multiple times) by someone who said they had a “great story to tell” and they want to tell you all about it, and hint that they want YOU to write it for them (I always tell them they need a ghostwriter for that). These people, none of these people, are the aspiring writers nor are they trying to get published. And most people look you and say, “Wow, you wrote a book?” (That’s usually followed by that dreaded question of: “How many books have you sold?”), then you realize that you are doing something “special”.

When I began to look at it that way, it eased up that dreading feeling of: “I don’t think I’m going to make it…it’s just too many people out there doing the same thing I’m doing.”

This is the age where writers can see their stories in paperback by doing it themselves, when before, trying to wait to be “discovered” by a publishing house and/or agent seemed fruitless. This is the age where dreams can come true.

I’m a writer and I’ve completed and self-published novels.

Hear me ROAR!! 🙂

Embarrassed about watching Hentai?

My “watching Hentai theory” is a mixture of: Adam and Eve, Gone with the Wind, Stephen King, and Mutants. I have these theories and beliefs in my head and so, being what I am, I wrote about it.

I even created an entirely new website just for these kinds of thoughts of mine, and I wanted to share it with ya’ll.

My novels aren’t the “religous” types, and it they do contain sex–probably too risqué sex scenes for some–(hey, that’s what I write!), but usually, I put some kind of “faith” or “belief” system in them, because that’s a piece of who I am.

So, yeah, I’ve been called a “Heathen” and my Belief “questioned” and also been told that I was “going to Hell” because of my new thought processes about the Bible stories. But, honestly, my Faith has strengthened since my personal research on the stories. And I’m only quoting what’s Biblically written. I’m not saying what’s NOT in there. I’m just telling what IS in there. And, as someone told me, “It’s just YOUR version of interpretation.” Hey, sure. And that applies to every person who tells you anything about the stories in the Bible.

All-in-All…it’s pretty much magical and wonderful to me! And anything magical, ALWAYS has my attention! Heh. Heh.

I’m sticking to my current theology…until something makes it change and proves otherwise. 🙂

If anyone of you guys and dolls decide to take a gander, pre-warning, it’s pretty long winded. Well, let me be honest, it’s VERY long winded. So, if you have an hour (er…well actually a few days), just like reading a book, go take a look and let me know what you think. If you want to comment on what I said, just post it back here on this blog post.

Here’s the link.

Embarrassed about watching Hentai?

Book Trailers and FREE eBooks

Yep, I made some Book Trailers and I’m giving away FREE eBooks. You can find the ebooks at Barnes and Noble Nook and at Smashwords

My favorite word…FREE. And why am I offering my books for FREE you ask? Well, just two of them. I just can NOT give me baby, my first born creation, The Made, out for free. But the other two, I don’t mind.

I’m not making any money anyway, so why not build up a fan base with some FREE stuff! As I write this, I currently have over 1,100 downloads/views of Ruby, Flesh and Heart on Smashword…and counting. I’ve been giving them away for free since February and I’m just now posting that fact. Heh. Heh. I have this goal that when, or if, I reach 5,000 downloads/views, then I’ll make them “payable” again. The hubby set that number. I figure that would be a good goal to reach. And who DOESN’T like the “F” word when it comes to stuff?

FREE!!

Book Trailers


Yep. Decided to make me some Book Trailers while I was at it. You can view them all on YouTube under my PenVizion (that’s with a Z) User Name. I downloaded the Windows Live Movie Maker and did some test runs with Microsoft Clip Arts before actually buying some Stock Photos and Stock Music to use. I went to Dreamstime for the photos and bought the music at AudioJungle. I must say, these two sites got some great stuff! I downloaded like 27 images for about $140.00 and the songs were like $14.00 each (with $2.00 added for using PayPal, making them $16.00 each). I just listen to the music just for fun because I love the way they sound. I replay and replay and replay….

My lessons learned on working on Book Trailers?
When I used the Clip Arts and then changed the photos to what I bought from Dreamstime, I had to redo the fonts, lighting and transitions because the photos were just too different, and the “mood” of the pictures changed the entire theme.

Wasted Money?
There was just one (1) song and one (1) picture that I didn’t use. I think that was pretty good. I learned to do the Movie first and then just run the movie and play the music off of AudioJungle before buying the song…just to see how the song looked with the Movie Photos. It took me four (4) entire days to complete them. And I’ve posted them on my Author Page on Amazon, on Smashword, in this blog, on my website, and in Facebook.

Hope you like them as much as I do. THEY WERE A LOT OF WORK! So, of course I’m gonna really like them!

Enjoy the show! 🙂

I’m not PC Literate…Can I still Self-Publish?

If you’re not very PC Literate and you want to Self-Publish, then… well….

I really, REALLY tried to find a positive answer for that kind of question, and I couldn’t find one for you. 🙁

UPDATE (November 19, 2011)!!! I’ve now concluded that you can go to Smashwords and they can give you a list of companies that would format your book for you. Then Smashwords would upload to all the different formats and platforms. Easy Peasy! Otherwise, you’ll have to find services like I’ve stated below, and still learn how to personally manage your business…which is what it is…a business.

WhatsAPC

Unless you have a lot, and I mean A LOT, of money to pay five (5) or six (6) other people to do all of the work for you…then I would head to a local community class and take some PC courses.

There were a few different discussions on the Absolute Write Water Cooler Forum site about people who don’t have much PC skills, or asking for help in this or that area. And the same answer came back again and again.

You have to learn it.

You need to try to save as much money as you can by learning and doing what you can for yourself. That’s the first word in self-publishing…self. You have to do it yourself.

And please read the below one hundred times

Please do not undertake Self-Publishing in a light manner.
Writing IS the easy part.
There is a horrible stigma among authors and readers looking down on those who self-publish because they put together a terrible book. It makes all self-published authors look bad.

That’s basically what someone stated in the forums and I’m reiterating. It needs to be as professional looking as you can make it. It’s a label on yourself, and you really want yourself to look good, right?

So yes, there’s A LOT of time of trying to put just the beginning steps of self publishing, in line, which I listed on my Blog Page: My Steps To Self Publishing. And I’m STILL doing things to perfect and add my books to places. It’s been three (3) years and I still haven’t started on my marketing, which I think I’ll do on one of my next novels that I publish. It might not take you that long, however. Life caught up with me…being a new parent, commuting, more responsibilities at the job…etc. etc. So, it’s taking me some time to get to the right spot.

But as I take my steps, I’ll jot them down for you. In the mean time, get going and take some PC classes. You’re gonna need the skills to help you through this.

And also, Be Careful out there! If you want to pay someone, then be aware of companies who make their money, NOT from selling books, but from the authors themselves. Checkout any company you want to use at SWFA’s website of Preditors & Editors

Until Next time!

PDF to FLIP Page FREE


Made more updates to my website. I wanted to convert the excerpts of my books to a “flip page” type of style. I found two sites which I tried out.

I tried this site first:CodeBox, which converted my PDF file to a Flash file automatically and it was …you know me… FREE!

But my problem was that there was a wide open space and, when you zoom in, you have to move the entire page all over the place to read it. I then played around with the settings and came up with: Page width 150, Page Height 297, Preset Standard A4. That got rid of the big space. I also found out that you can’t double-click and open the index.html file while it’s still zipped, or you’ll get the error below on the webpage. So make sure you unzip before you try it out.

PDF2FlashPageFlip Book
To view the book, you need the latest Flash player.

I then found this site Flip Builder. And it looked pretty good. Yes, I had to wait a bit for it to be emailed back to me (a few hours and one the next day), but it looked just like I wanted for a software that’s FREE. When you zoom in, you still have to move the entire file, but I liked the the “flip-page” sound and the many button options on the bottom. It also displays how many pages are in the file. NOTE: IT WILL ONLY ALLOW YOU TO LOAD 20 PAGES!! But 20 Pages was enough for me for an excerpt of my books. The maximum size for CodeBox is 10 Megabytes, so my novel, The Made, which is 1.75 Megabytes and 448 Pages, will fit.

With both options, you can rename the index.html file to whatever name you want and it will work. You really need to do this because your website already has a “index” file, so make sure to rename.

BookBuzzr
Here’s another application which I ran across while viewing other author blogs. I haven’t played with it myself, but it does have some nice features. Also the flip page part is FREE. So check out BookBuzzr as well.

So, you wanna see my pages flip? Take a look! And click on Excerpt to view the books.

Researching about your website, you should always keep it fresh and not let it sit like a brochure. Always update. But I keep trying to make improvements and so that’s why I do it. 🙂

And if you don’t want to bother with the PDF flip stuff, just remember that Kindle has a sample option you can turn on for your novels, and Smashwords (my book links below) has an online Preview.

Until Next time!

My new buddy… yWriter (tips and tricks)

I wanted to share some tips and tricks of yWriter. Stuff I’ve learned and had to research and find out to make my life a bit more easier, though yWriter is making it is easy enough (and more fun) for my writing.

Importing from MSWord
Prepare your MSWord Novel for importing into yWriter. Doing these steps would make things a bit easier.

  • Open your MSWord novel/project
  • Make sure there’s a chapter, the word “Chapter 1” for each chapter. If you’re using Headings to automatically number your chapters, these are okay, but the words/titles beside the chapter will not be pulled over to yWriter. I recommend just put the name of the chapter on the next line down.
  • Do a search for the word “Chapter” throughout your entire manuscript and make sure to replace them with a different made-up like {achaper} or something like that, and put it inside brackets–MUST USE BRACKETS. You can then highlight the first Chapter imported into yWriter; go to SEARCH > GLOBAL SEARCH AND REPLACE and look for that particular made-up word {achaper} and replace it with the word “chapter”. I use the brackets so that there would be no mistaking it. It won’t replace any partial words anywhere else in the novel. For instance, as the software states: If you use HAL to replace BAL, it will also change HALF into BALF
  • Put a * * * ( three asterisks with spaces in between) before each scene. A scene is anywhere that you have a double-space to show a passage of time or a change of scenery. Put the * * * in every place before your scene. NOTE: In MSWord Click CTRL+H, and in the “Find What” box put three ^p or two ^p to find paragraph marks. Then in the “Replace With” field put ^p^p* * *^p. For those area where you want to keep the * * *, replace those with # # # instead. yWriter ignores the # symbols. You can use yWriter and do the SEARCH > GLOBAL SEARCH AND REPLACE and change it back to asterisks once the novel is imported
  • After the asterisks, make two RETURNS/PARAGRAPH spaces and Type a line for the scene description
  • Then make another RETURN and Type a line for the scene title
  • Go to FILE > Save AS, and make sure to save the document as a RTF
  • Open yWriter5, click the PROJECT> IMPORT INTO NEW PROJECT > IMPORT A WORK IN PROGRESS
  • Choose the RTF file of your novel/project
  • yWriter will import the novel and then prompt you for new project file name
  • Open up each scene and highlight the Description that you typed after each * * * in MSWord. Then RIGHT-Click and select “Cut selection for Scene Description”. This will take the highlighted words out of the scene and put it in the “Scene Description” field automatically.
  • Highlight the Title of the Scene and RIGHT-Click and select “Cut selection for Scene Title”, and you’l have your “Scene Title” in its field

AND YOU’RE DONE!!

Quickly make Characters, Locations and Items while you type.
Or this can make things quick while your read through an imported document. Simply highlight the word, RIGHT-Click and make your choice

  • Create character from selection
  • Create location from selection
  • Create item from selection

Then go to the tab for the selected item and update the description

Automatically add characters for each scene
In the Main View, click the Scenes pull-down menu and select “Automatically add characters to scenes”. You can do this for locations and items as well. I do this all the time as I go back and forth to scene to update my lists.

How to write in full screen mode in yWriter
I didn’t see it at first, but there is a way to write with a larger screen to have your work just flow as you write in yWriter. Just Right-Click inside the Scenes area when you have it opened and select “Full screen text editor”. It doesn’t have rulers, but you can select “Full screen test editor with margins” if you want to have the writing area in the middle with white space on the sides. Click the ESC button on your keyboard to exit out of this mode. You could also, in the Main View, RIGHT-Click a scene (don’t open it) and select “Open content with default RTF editor” which would open your MSWord, and you can edit your scene that way. !! THIS ISN’T RECOMMENDED!! Because you can easily loose your work if you don’t follow these steps EXACTLY when you’re done editing that scene.

  • Save the RTF File. Just click SAVE in the MSWord document
  • Close the RTF File. FILE > CLOSE in MS Word
  • RIGHT-CLICK the Scene again in yWriter and select “Finished with external editor”

!! If you don’t do these steps, all the editing and new work that you’ve done would be lost. !!

How to make a Scene or Chapter Unused
Simply Right-Click the Scene or Chapter in the Main View and select “Toggled Used/Unused”. An Icon will display the state of the what mode to remind you.

Don’t want Chapters?
You can make something else, other than a “Chapter” and change it to “Other”, which would work great to make a Timeline using the scenes titles as days/dates/times.

How to Zoom In Text
I didn’t think I could make my text larger or smaller while I typed, because I didn’t see a VIEW menu AND I didn’t want to use the Font size to change my font anyway (that’s on the Main View SCENES > SET FONT ACROSS ALL SCENES). I just wanted to make the text a bit bigger. Well, while I was showing my hubby my new best first, my hubby (my personal internal Desk Support guy) said, “Just hold down your CTRL button and use the scroll on your mouse.” Really? Yep. Really. I was like, “How you know that would do that?” He said, “It’s Windows” as if everyone should know this.

How to make Single, Double Space Lines
Use CTRL+A to select all of the scene
Use the following:

  • CTRL + 1 for Single space lines
  • CTRL+2 for Double space lines
  • CTRL+5 for 1.5 space lines

Set all the Scenes to Draft mode or 1st Edit mode
In the Main View, hold down your SHIFT key and select the first and last scene (this will select all scenes. To select individual scenes, hold the CTRL key). Then RIGHT-Click and click SET-STATUS > DRAFT

Organize Folders
Make sure to create a folder for each individual project. It will help manage things better. For instance, I have a Book folder and under that a title for each of my books. Then I have another folder called yWriter to place that particular book’s project in there.

  • BOOK
    • TITLE OF BOOK
      • yWRITER FOLDER
    • TITLE OF 2nd BOOK
      • yWRITER FOLDER

That’s all my tips and trick for yWriter that I’ve been using and having fun with. You have anymore? Let me know.

Until Next Time 🙂

You’ll Never! get better at writing!

Some years ago, I got my feelings hurt when critiquing someone’s work. It was sometime before 2002, and it still stays on my mind. I knew it when I wrote it that my observation wouldn’t be taken very well. I could tell immediately because of the how this person wrote his story.

I’ve been a member of Critters for some time (I joined in 2000), and it has shown me A LOT about writing. In order to learn to write, a professor once told me, you need to read. And having to do a critique at least once a week at Critters definitely taught me a thing or two about improving my own writing. In just a year, I could immediately recognize: beginning writers, talented writers, boring writers, teeny-bopper writers, college writers, arrogant writers and everything in-between writers.

I don’t remember the author’s name, so please don’t ask me. Like I said, it was a very long time ago. But, this person had a story that I looked at and saw some potential in it. However, he had like 20 new words for the reader to digest. I mean, he had a new word for a type of food, introduced over five characters, new words for places and other items…and this was all with in the first five or so paragraphs.

So, I listed these words, and I told him that I could not complete reading his story. I couldn’t finish it. I also told him I had just came back from a creative session (or critiquing session) where they tell you how long you have to keep an agent and/or publisher’s attention if you want to submit your work. It’s called “The Hook”, which is only the first sentence. You just got ONE line to keep someone’s attention, and he had it. But then the story got so convoluted with so many new terms and descriptions that I just couldn’t keep track of what was going on.

I explained my reasons why and couldn’t continue reading his story, like I’ve done now, and told him that it wouldn’t keep anyone’s attention and that he needed to cut down on all the new words and introduce characters and places slowly throughout the story. That’s what a book is for–it’s not a short story–you can space things out and provide a good pace of explaining things.

Well, of course, he was pretty upset with me and told me so. He also went on with saying that if I had continued reading the story then blah, blah, blah, and I would have known, blah blah blah, and he hoped I didn’t critique EVERYONE’S story like a agent. And ended his words with a statement: At least you got your 200 word weekly critique requirement met. Or something to that effect.

You know, I was in a critique group where this one particular writer refused, supply refused, to put her story in paragraphs and use quotations. Also, in this critique group, it was required that someone else read your writing out loud to the rest of the group. When someone else reads your writing, you can hear the flow of it, and you can see if the reader is understanding the way you intended your story to be read. Well, she wanted to read her own work because no one else understood how to project and place emphasis where it needed to be. Well, with no quotes, no paragraph breaks, no writing format of any kind, how DID she expect people to read her work? Eventually, we had to tell her that she could not come back to the group.

As I said before, after reading Soooo many types of stories and writers, I can SEE this type of personality. I can see the arrogance. I can see that this person only wants to be praised and NEVER wants to be critiqued.

The guy with the 20+ new words? I shouldn’t have wasted my time. I could see that my critique was not going to go over well. But I just wanted to help by showing him where he went wrong; how he could improve his work. But, you know, I just wasn’t quite sure if I should sent it, but, you know, we’re in a critique group so… I mean, that’s what a critique group does. People critique.

After that incident, I just don’t bother. I read the first line, or few paragraphs, of a story and if I see the signs, I just go to the next story – something I can read without stopping ever-other-sentence and not be able to enjoy the reading. I just hope that those types of people go to the section that explains: “How many reviews should I expect, and when? What if I didn’t get many?“. That will tell them.

My first paper in college, I got a D-, and I think the Teacher Assistant (TA) was being nice when giving me that grade. But he said, in BIG RED INK: “You Can Not Write Like This In College!” Damn. That was hurtful. I mean, it REALLY hurt. I almost got kicked out of college because I couldn’t figure out the difference between “were” and “are” and “is”, and what a darn thesis was. On top of that, I was in a basic writing course that I couldn’t pass. It was called Subject A at the time. I think, that last course, I only passed because after the 3rd time I took it, the students left to take the course had English as their 2nd language. I mean, I was going to get kicked out because I couldn’t even pass a simple, basic, writing course!

I put in some hours to stay in college. I went to tutor after tutor after tutor on every term paper I wrote for my first and second year of college until I got it figured out. It was hard and tearful work! But I finally figured out the formula for what was acceptable for college and I figure out the difference between “were” and “are” and “is” because another professor told me: “If you want to know English grammar, learn a 2nd language.” So, I had to take a 2nd language course anyway, and sure enough, Spanish helped me. (I’m not bilingual now. You don’t use it; you lose it). I finally began to get B+ and A-. I even found out that I got better grades in my courses when term papers were the focus (in-class writing tests that also required memorization…I didn’t do so well, but I LOVED multiple choice!)

I recently joined the WritersBeat and I conciously put down a critique of someone’s story there. It was just re-emphasizing what someone else had said earlier. If the other person didn’t say something, I would have just avoided it and went to another story.

But you know what that author said? The author said:

“The point is duly noted and I shall learn from it.”

TAH-DAH!!!

Now, THAT’S a writer!!! And he’s only been writing for up to 1 year. And you know what? He’s going to get better at it!

You want to know how NOT to improve your writing? You want to know why you’ll Never! get better at writing? Check out J.A. Konrath’s blog: How Not to Write a Story It’s hilarious and pretty sad. I can HEAR the frustration in his voice with some of these people who submit their stories to people to read. And they expect people to like it?!

You’ll Never! get better at writing! You’re darn skippy! Keep singing in the shower.

Until Next time 🙂

P.S. This blog was my follow up on my comment I made at the end of I Like the Feel of Paperback. No eBook For me! The last part on How NOT to write Novel.
Template to format your MSWord Novel to Kindle

I’ve put together how my book was constructed for the Kindle. I used the preview in Kindle to make sure it looks okay.

NOTE: Want to watch an Instruction Video for the below that has a template? Just go to Deana Zhollis Writing Tools.

The first step for the html programming I found on Critique Circle. I’m not a member. I actually was looking for something else and found this nifty way of getting your MSWord ready for html. If you use the MSWord converter, it just creates a whole lot of garbage html stuff that you really don’t need. Thus, if I had known this neat and quick way to change my MSWord to html WITHOUT loosing my italics, I surely would have used it instead of copying and pasting each-and-every-chapter into my Dreamweaver (for FREE html software, try out Kompozer. I downloaded it and it works great!), and then I had to compare my MSWord document to the HTML to put the darn formats back in. Not fun. But this now saves me a lot of headaches.

I’ve edited Critique Circle’s instructions to make it more general.

STEP 1

You can convert bold, italics, underline and centered text in MS Word to html formatted text before copy/pasting your text into your html programming/code window. In this way, you will not loose your italics, for example, when you copy/paste. The below instruction explains how to do this with bold and then you can use the same steps for the other formats

To do that, open up MSWord document and then open your find-replace option (CTRL-H), and make sure you are working in a throwaway copy of your manuscript so that you don’t accidentally save over it.

In the find-replace dialog, make sure you have your focus in the “Find What” text box (just click it) and then click on the “More” button, at the bottom of the dialog. There is a “Format” drop-down button. Click that and select “Font”. Now, select “Font Style” and then “Bold” and click OK.

NOTE: There is an easier way. You can press CTRL-B to toggle bold, CTRL-i to toggle italics, CTRL-u to toggle underline and CTRL-e to toggle centered. Just remember to have your focus on the “Find what” box and use the “Clear formatting” or “No formatting” to clear out previous formatting before entering a new one (ex. it might say “Not Bold”, which is not the same as not searching for bold text. In this case you should hit CTRL-B again to clear the bold flag)

Under the “Find What” text box, you should now see “Format: Font: Bold”.

In the “Replace With” text box, enter [b]^&[/b] and click “Replace All”.

This will find every piece of Bold formatted text and encase it with [b] and [/b].

Do the same with italics, underline and center (that’s in the “paragraph” option group). In every case, make sure that the option you had before is no longer selected, so that only bold, italics or centered is shown below the “Find What” text box.

Even if you have text that is italics _and_ bold you use the same method.

Here are the codes you want to put into “Replace With”:

Bold: <strong>^&</strong>

Italics: <i>^&</i>

Underline: <u>^&</u>

Centered: <c>^&</c>

STEP 2:

This part includes the following supported html coding the Kindle needs in order to look properly in their viewer. It will include the following things:

<a name=”TOC”/> for Table of Contents right before your Table of Contents

<a name=”start”/> for Go To Beginning where you want people to go when they first open your book

<a name=”cover”/> for Go To Cover where it will display your beautiful picture/cover of your book

<mbp:pagebreak/> for Page Breaks, which I mentioned in an earlier post

I researched if I needed to put the cover (<a name=”cover”/>) in my book or not. I couldn’t find anywhere where people were leaning more to the “to do” or “not to do”, so I left the cover out in my Kindle version. I can always insert the picture later on if I want. I read somewhere that I could put the cover at the end of the book, so that’s where I put it in the example below.

It also includes:

  • Table of Content in HTML
  • A bullet list in HTML
  • Dropped Case in HTML (The first letter of a chapter enlarged or larger)
  • A Glossary
  • A Prologue
  • About the Author
  • And stuff to put before the story begins (ISBN Number, Dedication, Website etc)

So, here goes my code. Hope it’s helpful.

<head>

<meta http-equiv=”Content-Type” content=”text/html;charset=iso-8859-1″ />

<title>{Enter your Title of Book here}</title>

</head>

<body>

<center><h2>{Enter Prologue Title Here}</h2></center>

<br>

<p>{Start the prologue text here}</p>

<p>{And keep on typing it all up}</p>

<hr />

<mbp:pagebreak />

<br />

<p>This book is a work of fiction. Names, characters, places, and incidents are the product of the author’s imagination or are used fictitiously. Any resemblance to actual events, locales, or persons, living or dead, is coincidental.</p>

<br>

<br>

ISBN 10: {Enter Number}<br>

ISBN 13: {Enter Number}<br>

<br>

{Title of Book here}<br>

Copyright {Date} by {Author Name}<br>

All rights reserved.<br>

Published by {Name here}<br>

http://www.{web address}<br>

<br>

Cover Design by {Name here}<br>

http://www.{web address}<br>

<mbp:pagebreak />

<br>

<br>

To my family and friends who ….

<hr/>

<mbp:pagebreak />

<center>

<hr />

<font size=”+4″>{Title of Book Here}</font>

<hr width=”10%” />

<font size=”+1″>by {Author Name Here}</font><br />

<hr />

<br />

</center>

<mbp:pagebreak />

<center><h2><a name=”TOC”/></a>TABLE OF CONTENTS</h2></center>

<br>

<br>

<a href=”#Ch1″>Chapter 1 {Name of Chapter}</a><br />

<a href=”#Ch2″>Chapter 2 {Name of Chapter}</a><br />

<a href=”#Ch3″>Chapter 3 {Name of Chapter}</a><br />

<hr />

<a href=”#Glossary”><font size=”+2″>Glossary of Terms</font></a><br />

<hr />

<mbp:pagebreak />

<a name=”start”/></a><h2 id=”Ch1″>Chapter 1 – {Name of Chapter here}</h2>

<br />

<p><font size=”+4″><b>E</b></font>lephant went for a swim on a cool day. Begin novel story and stuff here.</p>

<p>Last Line of the chapter is here.</p>

<p> <br />

<mbp:pagebreak />

<h2 id=”Ch2″> Chapter 2 – {Name of Chapter here}</h2>

<br />

<p><font size=”+4″><b>T</b></font>he sun went up and then down again.</p>

<p>Last Line of chapter and 1st part of book here.</p>

<p align=”center”><strong><em>The End</em></strong></p>

<hr />

<mbp:pagebreak />

<h2 id=”Glossary”>Glossary of Terms</h2>

<p><strong>Magic:</strong> Used thooughout the entire Novel to make things sparkle and look pretty.<br />

Examples of certain techniques:

<ul>

<li>Song ability</li>

<li> Animal ability</li>

<li> Water ability</li>

</ul>

<p><strong>Poor:</strong> An individual in a state of despair and desperation.</p>

<hr />

<mbp:pagebreak />

<h2 align=”center”>About the Author</h2>

<p> </p>

<p>Lori Jones is an instructor for elephant painting and dancing

<hr />

<mbp:pagebreak />

<center>

<h1>Other Books</h1>

Elephant? Where are you?<br>

<br>

<strong><font size=”3″>(Coming Soon…)</font></strong><br>

Elephant – Together at Last<br>

Mice and Elephant<br>

<br>

<br>

<strong><font size=”4″>The Tusk Series</font></strong><br>

<br>

Tusk – White and Shiny!<br>

<br>

</center>

<a name=”cover”/><img src=”http://www.zhollis.com/images/TheMadewebsite.jpg” alt=”TheMade” longdesc=”TheMade.htm”>

</body>

</html>

Below Code is for Multiple Books within a Novel. It also includes:

  • Table of Content in HTML
  • A bullet list in HTML
  • Dropped Case in HTML (The first letter of a chapter enlarged or larger)
  • A Glossary
  • A Prologue
  • Book I and Book II (Book II has the Chapter Numbers starting from 1 again)
  • About the Author
  • And stuff to put before the story begins (ISBN Number, Dedication, Website etc)

So, here goes my code. Hope it’s helpful.

<head>

<meta http-equiv=”Content-Type” content=”text/html;charset=iso-8859-1″ />

<title>{Enter your Title of Book here}</title>

</head>

<body>

<center><h2>{Enter Prologue Title Here}</h2></center>

<br>

<p>{Start the prologue text here}</p>

<p>{And keep on typing it all up}</p>

<hr />

<mbp:pagebreak />

<br />

<p>This book is a work of fiction. Names, characters, places, and incidents are the product of the author’s imagination or are used fictitiously. Any resemblance to actual events, locales, or persons, living or dead, is coincidental.</p>

<br>

<br>

ISBN 10: {Enter Number}<br>

ISBN 13: {Enter Number}<br>

<br>

{Title of Book here}<br>

Copyright {Date} by {Author Name}<br>

All rights reserved.<br>

Published by {Name here}<br>

http://www.{web address}<br>

<br>

Cover Design by {Name here}<br>

http://www.{web address}<br>

<mbp:pagebreak />

<br>

<br>

To my family and friends who ….

<hr/>

<mbp:pagebreak />

<center>

<hr />

<font size=”+4″>{Title of Book Here}</font>

<hr width=”10%” />

<font size=”+1″>by {Author Name Here}</font><br />

<hr />

<br />

</center>

<mbp:pagebreak />

<center><h2><a name=”TOC”/></a>TABLE OF CONTENTS</h2></center>

<br>

<br>

<p>BOOK I: </p>

<a href=”#Ch1″>Chapter 1 {Name of Chapter}</a><br />

<a href=”#Ch2″>Chapter 2 {Name of Chapter}</a><br />

<a href=”#Ch3″>Chapter 3 {Name of Chapter}</a><br />

<br>

<p>BOOK II: </p>

<a href=”#Ch1_1″>Chapter 1 {Name of Chapter}</a><br />

<a href=”#Ch1_2″>Chapter 2 {Name of Chapter}</a><br />

<a href=”#Ch1_3″>Chapter 3 {Name of Chapter}</a><br />

<br />

<a href=”#Glossary”><font size=”+2″>Glossary of Terms</font></a><br />

<mbp:pagebreak />

<center>

<hr />

<font size=”+4″>BOOK I</font>

<hr />

</center>

<mbp:pagebreak />

<a name=”start”/></a><h2 id=”Ch1″>Chapter 1 – {Name of Chapter here}</h2>

<br />

<p><font size=”+4″><b>E</b></font>lephant went for a swim on a cool day. Begin novel story and stuff here.</p>

<p>Last Line of the chapter is here.</p>

<p> <br />

<mbp:pagebreak />

<h2 id=”Ch2″> Chapter 2 – {Name of Chapter here}</h2>

<br />

<p><font size=”+4″><b>T</b></font>he sun went up and then down again.</p>

<p>Last Line of chapter and 1st part of book here.</p>

<mbp:pagebreak />

<center>

<hr />

<font size=”+4″>BOOK II:</font>

<hr />

</center>

<mbp:pagebreak />

<h2 id=”Ch1_1″>Chapter 1 – {Name of Chapter here}</h2>

<br />

<p><font size=”+4″><b>S</b></font>arah found a wonderful shade next to the elephange</p>

<p>Last line of Chapter here.</p>

<mbp:pagebreak />

<h2 id=”Ch1_2″>Chapter 2 – {Name of Chapter here}</h2>

<br />

<p><font size=”+4″><b>W</b></font>ater fell down from the elephant into her eyes</p>

<p>Last line of Chapter here and last line of the entire book. Hurray! You’re finished! Good job!<br />

<br />

<br />

<p align=”center”><strong><em>The End</em></strong></p>

<hr />

<mbp:pagebreak />

<h2 id=”Glossary”>Glossary of Terms</h2>

<p><strong>Magic:</strong> Used thooughout the entire Novel to make things sparkle and look pretty.<br />

Examples of certain techniques:

<ul>

<li>Song ability</li>

<li> Animal ability</li>

<li> Water ability</li>

</ul>

<p><strong>Poor:</strong> An individual in a state of despair and desperation.</p>

<hr />

<mbp:pagebreak />

<h2 align=”center”>About the Author</h2>

<p> </p>

<p>Lori Jones is an instructor for elephant painting and dancing

<hr />

<mbp:pagebreak />

<center>

<h1>Other Books</h1>

Elephant? Where are you?<br>

<br>

<strong><font size=”3″>(Coming Soon…)</font></strong><br>

Elephant – Together at Last<br>

Mice and Elephant<br>

<br>

<br>

<strong><font size=”4″>The Tusk Series</font></strong><br>

<br>

Tusk – White and Shiny!<br>

<br>

</center>

<a name=”cover”/><img src=”http://www.zhollis.com/images/TheMadewebsite.jpg” alt=”TheMade” longdesc=”TheMade.htm”>

</body>

</html>

Okay. So, that’s what I used for my three (3) books for formatting. I hope this helps you guys out there with formatting from MSWord to HTML a little easier.

Note: the image html would look more like:

<a name=”cover”/><img src=”[imagenamehere].jpg” alt=”[ImageNameHere]”>

To see what it will look like, click <<here>>

Until next time…